M3/M4 下摆臂安装到 F2X F3X 车型的探讨
产品信息
商品链接:BMW M3/M4 LCA TS UPGRADE KIT FOR F2X AND F3X
其中一个有用的评论:
看这个评论,说是可以增加到 -2 degrees 的倾角,相比原厂增加了一度多一点点
YouTube 上一个博主的安装视频,没有任何结论:https://www.youtube.com/watch?v=10ohXbpcOos
商品地址2:Genuine BMW F20 F22 F30 F32 M3/M4 LCA TS Upgrade For F2X and F3X
这个产品的说明里说要配合这个东西:
描述:
M4 LCA upgrade Tension Strut Stainless Steel Cylindrical Spacers Shims Standoffs for the BMW F2X & F3X models.
To be used with the *Genuine BMW F20 F22 F30 F32 M3/M4 LCA TS Upgrade For F2X and F3X* when doing the M4 LCA upgrade on the F series M135i M140i, M235i, M240i, 340i, 440i.
We recommend using the smaller spacers towards the front of the car and the larger spacers towards the rear of the car if required .
论坛信息
https://f20.1addicts.com/forums/showthread.php?t=1233572
Lower control arms add about an extra 1deg of negative camber to front wheels.

Compared to 116/118, Mx35i comes -0.5 swivel bearing housing as std which could be an upgrade to your car if you want to add less negative camber.

My car (m135i with lowered springs and M4 LCAs) is running -2deg which is about the most I would run on a road car.

Finally if running running 17" wheels or less, be careful to ensure that LCA upgrade will clear the inside edge of the wheel. No issues with 18" and above alloys .
这个评论说可以到 -2 度
They fit without any problem. I have them on my pre-LCI 118i with lowered springs. Like BeePee, I have -2deg up front and I've never experienced any problems about it being too aggressive for road. FYI, they also give a remarkable amount of caster angle
这里说他已经在118i pre-LCI 上面使用了 ,没有任何问题,获得了 -2 度到倾角。(看轮胎数据是原厂轮胎型号)
Originally Posted by lefthander View Post
Thanks! I am on 18" wheel with front 225/40R18 tyres with offset 45 and lowered with AC Schnitzer suspension . Wonder if I will get any sort of rub from the LCA?

What tyres size and offset are you on?
Cheers !
I have the same setup as yours for winter and 40 offset wheels with same tyre size for summer and no rubbing with both. I don't think you will rub with that setup and suspension unless you go too low with coilovers or something
__________________
这个评论说他使用 40 offset 的轮圈不会蹭到任何东西,45 offset 应该也差不多,除非降太低了。
Quote :
Originally Posted by Bee Pee View Post
Why ?

Is that opinion or if based on fact, please elaborate ?
On my Scooby years ago, I run -ve 2 degree and tyres wear was a pain.
So probably my own bad experience .
这个评论说明他以前用 -2 度倾角,轮胎磨损很麻烦。
Ive been running -2deg and it's helping to save soft outer shoulder of mpss as getting even tyre wear across width of the tyre so combo of the geometry and mpss works fine for m135i
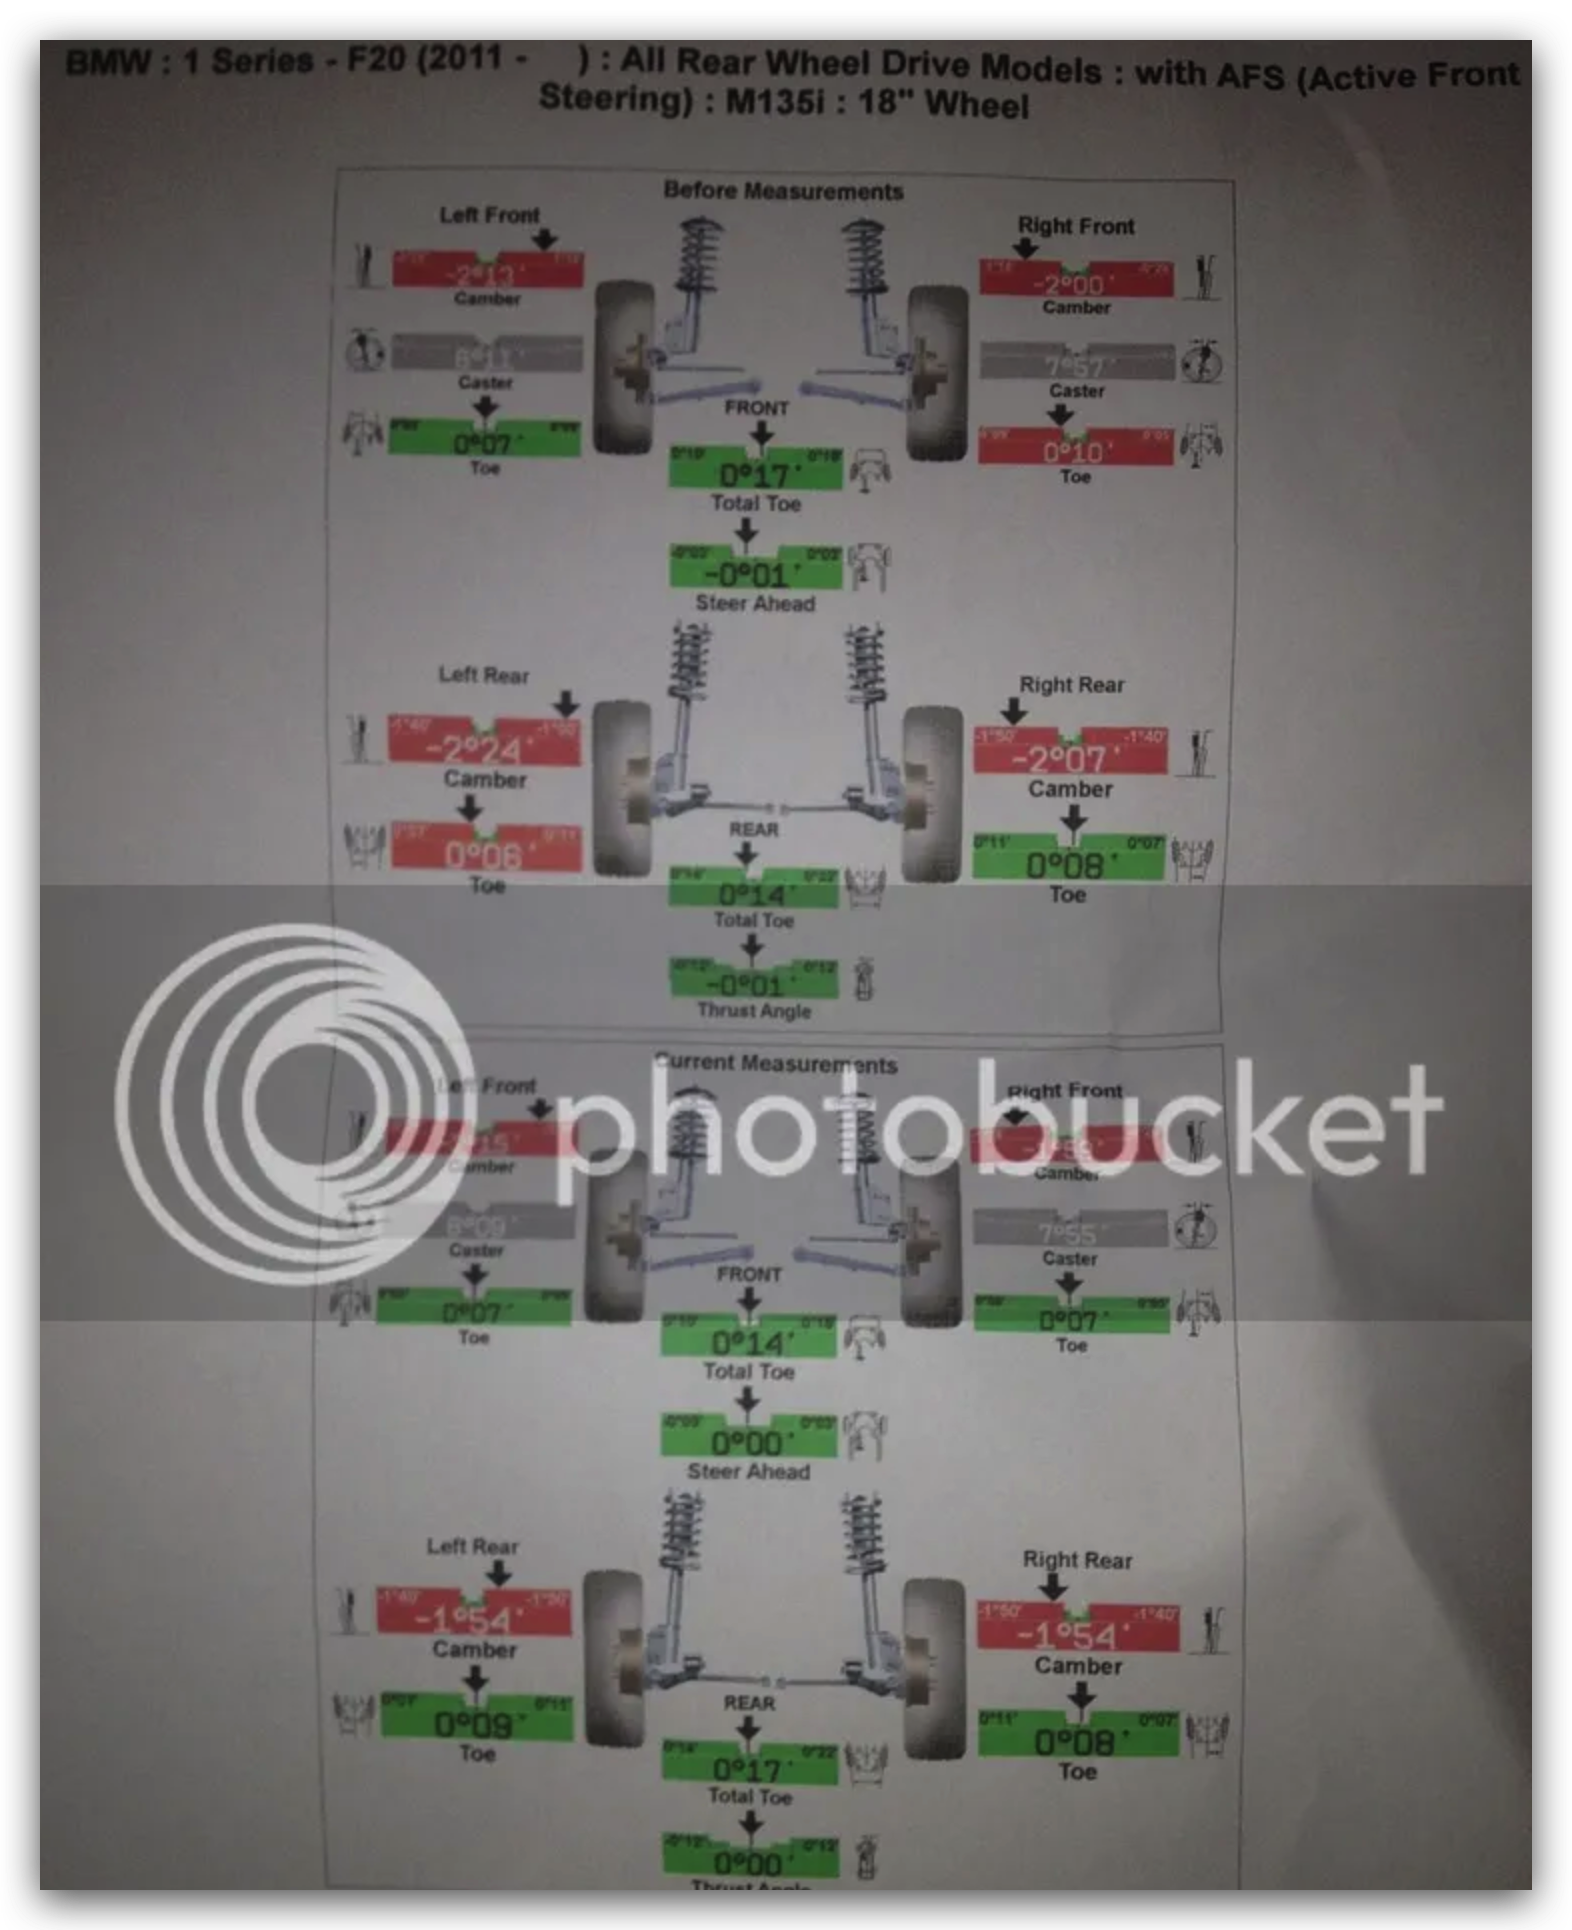
Had an alignment today. Zero toe like yours with -1.85 camber and 7.45 caster angle .
另外一个线索:
https://www.2addicts.com/forums/showthread.php?p=17669454
install on m135i, 车主到总结:
Summary of what these LCAs do

- added about 1 deg of neg camber
- moved the top of the wheel out a bit (reducing clearance to the bodywork)
- moved the wheel about 1/2" /13mm further forward in the wheel arch, adding some caster and more steering feel  (and further reducing clearance to the wheel arch)

My car's other chassis mods means it doesn't suffer from understeer and already has crisp turn-in. My wider, more aggressive offset front wheels mean I'm on the limit as far as contact between tyre and wheel arch.

This OE upgrade (on a stock chassis or for someone considering an alternative to Sway bars ) will:-
- be v effective in reducing understeer and making turn in sharper;
- negates the need for front spacers ( front track is o/a 1"/25mm wider);
- reduce wear on outer shoulder PSS;
- adds more feel to EPS in both modes.

In summary , whilst I'm in a dilemma due to gains on my setup being marginal and high compression contact with my current wheels, this OE upgrade is very worthwhile .
-2deg camber and large castor angle . Need to figure out a tension strut /arm that would reduce the castor (and perhaps camber a little too)
这里可以看出来为啥前面的商品页说需要购买那个金属套。。。。
另外一个关于是否蹭的信息:
Here's a brief history of my front end . I run GC camber plates.

Stock LCAs, -2.5deg camber:
Street: 18x8.5et37 255/35r18 Michelin PSS, zero clearance issues
Track: 18x9et36 255/35r18 Toyo Proxes R888, minor fender rubbing on track

Once I got F8x LCAs, my street setup had a slight rub in the front fender liner with half a turn of lock , plus a little fender interference at the lip . Also: I bent my front right fender a bit at autocross (track setup). I had to make a couple of changes.

Today's setup, with F8x LCAs, -3.5deg front camber, and rolled fenders:
Street: 18x8.5et42 255/35r18 Michelin PSS, zero clearance issues
Track: 18x8.5et36 255/35r18 Toyo Proxes R88, zero clearance issues

To roll my fenders, I flattened the inner lip flush with the inside of the fender about 3/4 of the way from front to rear . This gives another 2-5mm of clearance (w00t!) while retaining the original outer fender shape .

To do so, I wrapped an 8" long block of 1x2" wood in a soft shop towel (blue ones from Costco). I then clamped the block to the outside of the flat bit of the fender with a couple of plastic helper clamps. Then, I took a large C-clamp and squeezed the lip flat to the inside of the fender, using the block to distribute pressure on the outside. I worked bit by bit , starting from the front of the fender, moving very slowly towards the rear , checking my work every squeeze or two. As I worked along, I also moved the block to keep the squeeze point close to the middle of the block.

You don't want to completely flatten the lip all in one go. Doing so will introduce creases. Flatten it a bit in one spot , the next spot , etc. until you've covered the area you're planning to flatten . Then, rewind completely and start again at the front to get a bit more flattening . It's sort of like multiple coats of paint. I probably went over each fender 4 times.

Also note: the transition from being flat to the curved original profile needs to be gradual to prevent creases from popping up on the outside. I think I used about 2" to transition from flat back to original curved .